
Mad Craft #4: Do It Yourself My Little Pony Pinata (Part 4 – Finishing Touches)
I needed to take some time to recover from some Mad Craft Flashbacks, but now is the time to get this pony finished!
If you haven’t been part of this madness from the beginning you might wan to start with Part 1: A 20% Cooler Frame and Part 2: A Papier Mache Cast, and Part 3: A Fringiponi
(A lot of my inspiration and lessons came from A Rainbow Zebra project from the Pinata Boy.)
The Mane


By now I’m terribly, terribly done. I gather my resolve and flex my sore crafting muscles to make this pony look the best it can be for it’s ultimate fate to be smashed to smitherines. I get an idea to use some wax paper to fashion a base for the mane so that it drapes and falls the way it does in the cartoon.
I had put so much work into this pinata that I didn’t want to just stick some crepe paper streamers on it and call it a mane. Half-assed worked doesn’t look out of place on a project that was half-assed to begin with, but when you do that on something you did intricate work on, it sticks out.
I cut the waxed paper form around the Pinata’s head and made some cuts so that it would fall properly. I consulted a drawing of Twilight Sparkle and used a sharpie to draw free-hand guidelines for gluing on the crepe paper. Surprisingly, things went very smoothly, and even flat it started looking like a mane. Glue on wax paper is very slippery and I didn’t think it would stick at first, but once it dried it held up very well. The weight helped it to form and fall beautifully like a mane and forelock.
Wings and Eyes and Ears. Oh, my!

Four pieces of 38 cent craft foam.
For the wings, I drew a rough outline using the full length of craft foam to form the main part of the wing and an overlay to make it look like it was folded. I used the scraps to form ears and horn. This only took a few minutes! It took longer to Google the picture I used as a guide for the wings.

Ears and horn were formed from the scraps left over from the wings.
The scrap pieces left over from the lavender craft foam were just enough to form some decent ears (simple triangles from the corners) and a fair looking horn. This took only a few minutes to hot glue into shape then hot glue on the head. Yes, I did indeed glue my fingers.
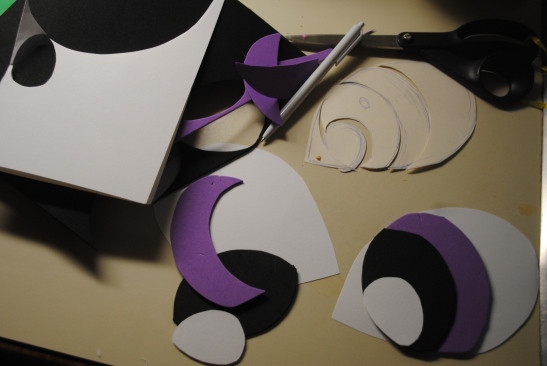
Craft foam and a free-hand template.
The eyes were made of black and white craft foam. I first free handed a rough outline of the size and shape of an eye on a piece of scrap card stock so I could test to see if it was the right size and shape to look good on the pony.

The pieces ready to assemble.
I then cut out the shapes and used those as templates on the craft foam and hot glued the pieces together. It took me about half an hour to finish the the two eyes from rough outline to assembly.

Princes Twilight emerges!
I am standing over my handiwork feeling very pleased with my bad self, when my first minion — my daughter — says to me, “Maawm! You forgot the cutie mark.”
I say in my head, “Shit.”
I say to her, “You are right, I did.”
I weep inside a little.


I rummaged through my card stock scraps and found the right size and color. A star punch make short work of the stars and a few scrap pieces of white triangles made some very nice star points. Then I stand there smiling at myself and realize that this goddam pony has TWO flanks. I go to fashion another cutie mark.

Shoulder candy door covered by the wing.
Finally! It is time to use that candy door! If you remember I cut it just above the shoulder which is a strong part so that I could insert the hanging hook. It was also a good location because it was completely hidden by the wings and mane. The kids filled it up with a few nice pieces of candy and many toys: coins, gems, glow bracelets, plastic animals, whistles (which sucked), erasers, and pencils.

The kids were very gentle!
Finally this pinata project is done!

She’s big but so cute!
I was a little worried that she might not hold up to a good beating…

Twilight takes flight!
To my utter delight every kid got to have a turn! Wings flew off, the horn dangled, an ear shot off, paper flew everywhere! Several holes were made before she broke a apart, fell to the ground and got mauled by a heard of snarling children.

Rest in Pieces…
This was all that was left of that beautiful pinata. We had a nice send off for the pieces as fodder for a roaring nighttime fire the a few hours after the party. Spike would have been proud of those flames.
Stay tuned for Party Favors: Pony Ears and Party Games
19 comments on “Mad Craft #4: Do It Yourself My Little Pony Pinata (Part 4 – Finishing Touches)”
Leave a comment
E-mail Subscribe and Support


My Reviews
Email Subscribe and Support
Shop With Me!
Shop and Read My Reviews
Aspiring writer, wife, mother of two, owner two cats. Teacher, lover of science, books, science fiction, fantasy, and video games.

All that work for it then to be smashed
LikeLiked by 2 people
Well, I at least it looks damned good on the way out 🙂
LikeLiked by 2 people
So pretty! I remember, 16 years ago my Mexican brother-in-law made a pinata for my son’s 3rd birthday and the wild stick swinging by the boys caused one bloody nose and one bruised cheek bone! Ah, those fun days…
LikeLiked by 1 person
My daughter did get beaned in the head pretty good. Funny thing that no one stopped hitting the pinata though. LOL
LikeLiked by 1 person
Absolutely gorgeous my little pony! All the hard work into it and turns out to be super awesome 😀 the kids look like they really enjoyed it.
LikeLiked by 1 person
There was much squealing and destruction!
LikeLiked by 1 person
Hahaha! I can only imagine 😀
LikeLiked by 1 person
If I made this and the kids smashed it, my daughter would never ever forgive me;)
LikeLiked by 1 person
Lol. Funny enough my daughter looked forward to beating it to bits.
LikeLiked by 1 person
My kid will go crazy building this 😀 and she will kill me if I smashed it 😉
LikeLiked by 1 person
Pingback: Mad Craft #4: Do It Yourself My Little Pony Pinata (Part 3 – A Fringiponi) | Laissez Faire
This is great!
https://hellaturnup.wordpress.com/
LikeLike
Thanks! It was a hugely ambitious project.
LikeLike
I can imagine! But the outcome looks like it was deffo worth it 🙂
LikeLiked by 1 person
It had a proper send off. It was torn to bits and what was left made a glorious fire.
LikeLiked by 1 person
Hahaha that’s the way to go!
LikeLike
The only thing that wore me out about this whole thing was the many many paragraphs that were sort of unnecessary. But the outcome was super cute.
LikeLike
Such a fun read! I thought I was over the top but here is a tip of the hat to you >) I am firmly convinced now that I will just do a pony head. BUT will use the wax paper and ear tricks for sure lol
LikeLiked by 1 person
I am you glad you enjoyed the journey. I wonder how often people make it through the whole series. LOL Good luck with you pony head. Watch out, it might turn into a full pony. You never know!
LikeLike