
Diary of an Inconsistent Cook #57: Braised Beef and Vegetables (#homecooking)
 Our house is still besieged by a viral plague and I have been hit the hardest multiple times with no relief between attacks. The laundry is piling up, the pockets of organized chaos have gotten out of hand, and it is all I can do to throw the kids sustenance. I may never catch up.
I had to do more today than slap together peanut butter and jelly and toss them a banana.
Braising to the rescue!
If you’ve never braised before, don’t be scared. All braising means is to cook meat and vegetables low and slow with some liquid. It couldn’t be easier. It’s good for the budget.
I happen have a favorite casserole dish I use, but any good oven safe pot will do fine.

Enameled Cast Iron
Here’s how it is done.
Step 1: Go to the store and buy a cheap cut of meat such as brisket or anything that catches your eye that looks impossible to chew (pork and chicken work well too). Season it and give it a good color in a saute pan…Waite your onion and garlic after. Deglaze the pan with your chosen liquid…that is good stuff stuck to it!
Step 2: Dig in the bowels of your freezer for that bag of string bean veggie medley. Braising will turn that squidgy mess into a delightful mixture of melt-in-your-mouth goodness. Put that in a layer on the bottom of the pot.
Step 3: To balance out the frozen veggies (most of them will disintegrate) cut some potatoes and toss in some baby carrots or use whatever vegetables you want. I use long cooking veggies because I always forget to add in delicate veggies 45 minutes near the end. Include sautee’d garlic and onions (or — if you are lazy or sick or ambivalent — don’t sautee’, but I recommend it). Layer this on top of the other veggies. How much depends on the size of your pot. Leave enough room for the cheap cut of meat to lay on top.
Step 4: Choose your seasonings. I used celery seed (because I almost never have actual celery), small bay leaf, salt, pepper, garlic powder, and rosemary. Use whatever seasoning combination you prefer fresh or dried. Season the meat and the veggies.
Step 5: Choose your liquid. I had chicken broth. You can use any number of liquids: beer, wine, beef stock, chicken stock, vegetable stock, or plain water. If you use broth, go easy on the amount of salt you add. Put in enough liquid to just cover the vegetables. Lay the meat on top. You don’t want the meat to be submerged because you don’t want to boil it. The vegetables should hold the meat above the liquid.
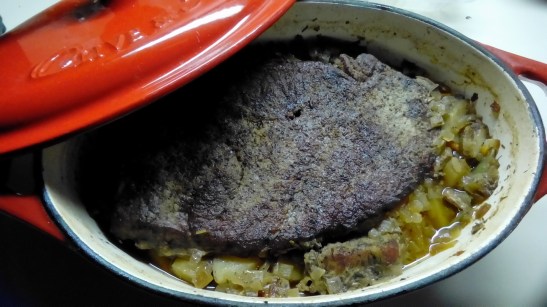
Step 6: Cover and cook in a low oven. About 250F to 300F. It will take a few hours. Low and slow! You will smell the goodness when it is close to done. The size of my pot and meat took about 3 hours and everything was super tender and the meat was falling apart. I served ours with baked rice (no beans this time).
Tip: If you like a broth a little thicker you can add some flour to the liquid before cooking or transfer the broth to a pan after cooking and make a gravy out of it.

So tender you can cut the meat with a spoon…
E-mail Subscribe and Support


My Reviews
Email Subscribe and Support
Shop With Me!
Shop and Read My Reviews
Aspiring writer, wife, mother of two, owner two cats. Teacher, lover of science, books, science fiction, fantasy, and video games.
