Mad Craft #5: A Super Why Third Birthday Party (Why Flyer Face Cut-Out Photo Board)
My son’s belated party went off very well with a few mishaps here and there (the cake and I had words), and a few forgotten items (notably the chips, dip, crackers and cheese). I was not sure exactly what to call this Mad Craft, but I do have a fondness for ridiculously long blog titles. I did look up what the official name of this “thing” is and I discovered that it doesn’t really have one. Not even a portmanteau (I really just wanted to say portmanteau). Dr. Google had entries for: face cut-out, face-photo thing, face-in-a-hole, stand-in, stand-up cutout, head in a hold, face in a hole, and carnival cutouts. If you want to waste about an hour going off on wild tangents you can read about it at World Wide Words to get you started.
Normally these are made of plywood or whatever thin wood-ish item fits that profile, but not everyone has that just lying around. Of course, not everyone has a gigantic piece of cardboard hanging out on their property, however, you can go to your local Sears or “Store that Sells Big Appliances” and ask them if they could spare any giant boxes. If that doesn’t work, you can also just duct tape cardboard boxes together until you got the size you wanted. Use what you have. As a matter of fact, you could go Super Mad Crafty and make the whole thing out of felt! No sewing experience necessary. Just a rudimentary grasp of scissors, glue, and shapes.
First a recap and then the final result!
Step 1: I begin by stopping the husband before he rips apart the uncommonly gigantic box I’ve had my eye on for weeks. “Are you crazy!? That is prime craft material. Egads man, put that back in the garage!” MINE! This box is the size of a card hood. In fact, that’s what came in it. Who knew you could have a car hood shipped to your house?

Printouts from a party banner from PBSkids
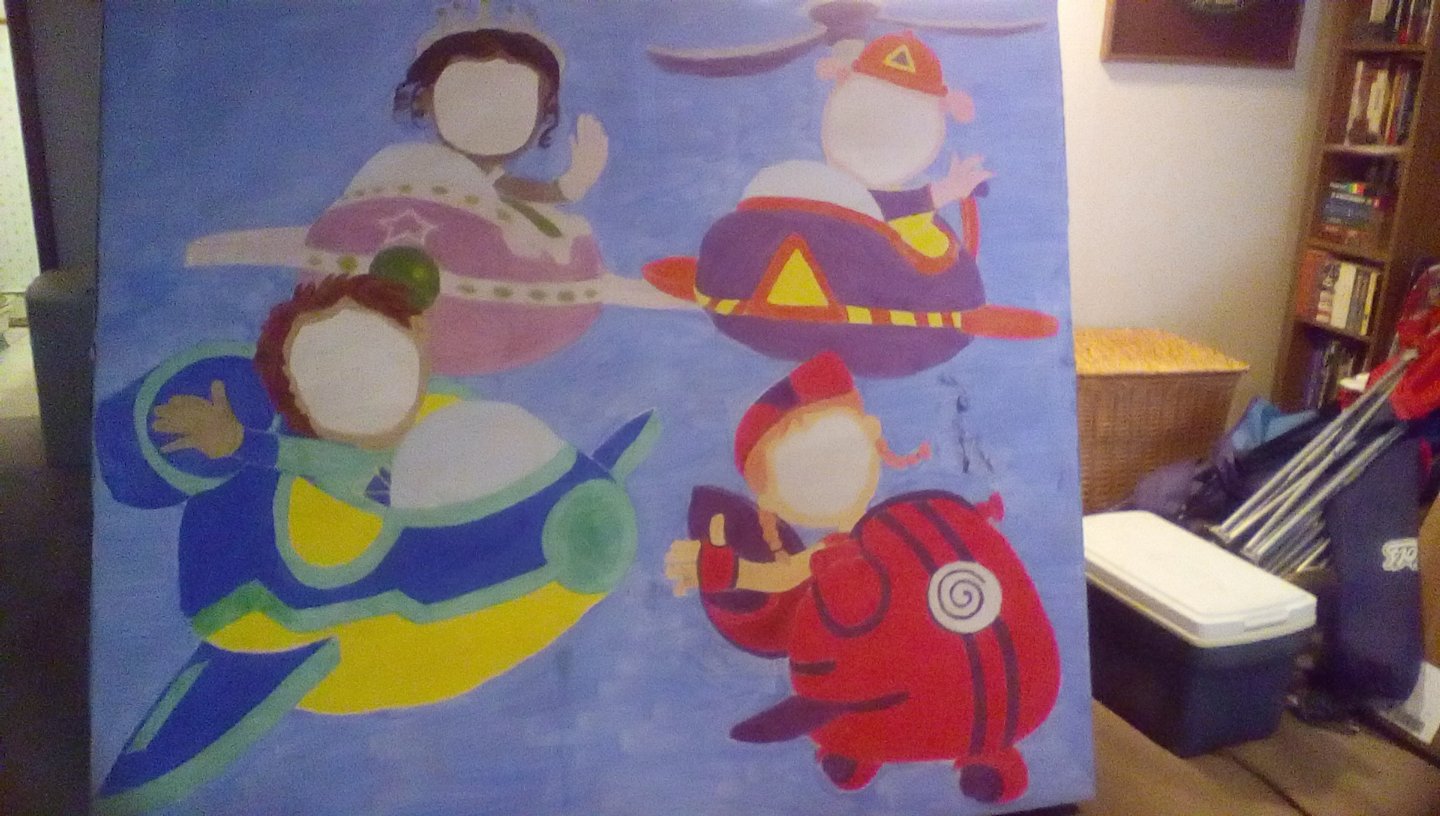
Step 2: Draw the Why Flyers from a print out freehand and admire your work. Strut a moment.

Who forgot to prime the box before they spent an hour sketching on it?
Step 3: Utter a profanity when you realize you forgot to prime the damn box.

Leftover primer from the Magnetic Chalkboard Train Table Project. Click the pic to see it.
Step 4: Take an hour to fix you noodle headed mistake. The sketching came out so damn awesome that I was afraid to just paint over the lines and not be able to duplicate the uncanny perfectness of it all. My back was aching by the time I was done. I then carefully darkened all the lines with a heavier pencil before painting over the whole thing with primer.

Step 5: Take a break and kick yourself in the pants for making the beginning of the project three times as long! It was very important to prime the cardboard or the tempera paint I am using will just absorb into it and be drab. If you are using regular house paint that you might have lying around, you can probably get away with not priming.

Step 6: Paint the heck out of the thing! You can view the pic-heavy slideshow at the end of this post for the process and big reveal. I am a low-intermediate painter/drawer at best, but the tempera paint and the drawings I used were very forgiving. I had planned to outline the whole project in black line or colored lines for a nice finish, but it turned out looking so well that I decided I was too tired to push the fates further!
Notables and Tips

All colors I used and mixed were made with powdered tempera paint: blue, red, and yellow. I also used White poster paint because I didn’t find my white tempera paint until I was finished with the project (isn’t that always the way?). However, the poster paint gave a nice effect to the Why Flyer windows and other colors that I lightened with it. Mixing in primary colors with secondary colors or secondary colors with each other creates a very wide range!
I had to use liquid washable tempera green paint for Wyatt because I just couldn’t (for some reason) manage to mix a vibrant color of green for Super Why’s Vehicle. I could make any color I wanted, except that green! The best I could manage was the pea green and green-yellow for Princess Pea’s Why Flyer. The pre-mix is not that vibrant and doesn’t paint on as well because you can’t control the consistency. All the other colors and shades–including brown, gray and maroon–were made very easily by simply mixing more of one of the primary colors to get the desired shade. I used a very small speck of powdered black tempera paint for Princess Pea’s hair to get it the dark, rich brown I wanted.

Muffin tins make excellent paint holders and easy to wash.
Tip 1: You can use other paints, of course, but always be sure that when you mix a color that you have a little left over for touch-ups. I made sure I had enough sky blue, especially, for any mishaps. I lined some Tupperware with plastic and poured in the paint, or I just covered my tins with plastic wrap to keep the paint as moist as possible. I added more water if needed.
Tip 2: My way of sectioning the drawings may not be the best way to paint it, but it did allow me to be sure that I painted light colors first and save the darkest color for last. I could easily mix a color and lighten it with the white. I even made silver gray paint with pale pink and a touch of blue! The accent color maroon, if I remember correctly, I made by mixing in just a very small touch of blue in with the red. Experiment and you will be surprised at the range of colors you can get. I looked for similar colors in each Why Flyers and Super Reader. For example, if I was doing orange those colors were in both Wonder Red and Alpha Pig. I started with Pig and then lightened the color with white to then do Red’s hair. I did the same for the light/dark purple, light/dark brown, pink/silver, and dark/light blues. The purple was interesting because there was the deep purple of Wonder Red, the blue lavender of Alpha Pig, and the pale lavender of Princess Pea, and the slightly different shade of accent purple on Wonder Red.

Leftover tray from an Easter Egg decorating kit.
Tip 3: I used two brushes. A one inch and a cheap kid’s paint brush with soft bristles. These were workable tools, but not ideal. To avoid having to wash brushes over and over, you may consider working with more than two! If you have a big surface area to cover, I recommend a brush bigger than one inch. I don’t recommend foam brushes for this project, they just don’t work well with tempera on cardboard in my opinion. I tried the one I had and it was horrible!
Tip 4: If you have kids, give them a project of their own because they will be up your hind end while you are sweating around those tight curves.
Tip 5: It took me three days of about 4 or 5 hours each day to complete this project. I would give yourself at least two weeks or more to give yourself some breathing space. While I had plenty of time left, I still felt rather “crafted out” by the time I was done.

Mix smart and there will be little waste and plenty for touch-ups!
Project Slideshow
E-mail Subscribe and Support


My Reviews
Email Subscribe and Support
Shop With Me!
Shop and Read My Reviews
Aspiring writer, wife, mother of two, owner two cats. Teacher, lover of science, books, science fiction, fantasy, and video games.
